ENERGIZERS &
RECOMMENDED ACCESSORIES
 Premier recommendations for setting up your Horse QuikFence™.
All you need is the netting plus the items below and your fence is complete (see our how-to video below right).
| • |
Energizer—Fences should always be properly energized. And any components needed based on the energizer.
|
| • |
Tester—Make sure you have adequate voltage.
|
| • |
Warning Sign—Use to inform passersby that the fence is electrified.
|
| • |
NEW! FiberTuff Post—if added support is needed at corners or ends.
|
If your particular situation has special considerations, please call and talk to our fence consultants at 800-282-6631.
Remember Free Shipping on qualified internet orders, see our website for details.
NEW FROM PREMIER

Make corners stronger and the fence tauter with FiberTuff™ posts. FiberTuff end cap (inset photo) is grooved to aid in controlling the net's top strand. If using multiple lengths of net, use a suitable energizer (PRS 50 pictured) to energize the net.
New! FiberTuff™ Posts
Use the 48" FiberTuff post with the Horse QuikFence™ 4/48/24. Strong, stiff step-in support post for ends, corners and major directional changes of temporary and semi-permanent netting. Steps easily into most soils.
Note: It is not necessary to weave the FiberTuff post into the netting.
| • |
PVC with 6 internal fiberglass "cables."
|
| • |
7 height choices (18", 20", 24", 30", 35", 42" and 48"). Height of post is measured from top of step-in foot plate to top of post.
|
| • |
2 diameters: 19mm and 22mm. 18"–30" posts are 19mm diameter; 35"–48" are posts 22mm diameter.
|
| • |
7" long step-in foot plate.
|
| • |
Black post with gray top.
|
| • |
Has a top cap with enlarged slot for easy threading of netting top wire.
|
TRAILER SAFETY TIPS
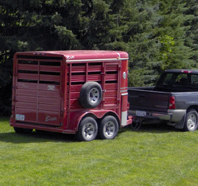 Before you get ready to hit the road with your animals, consider these trailer tips.
| • |
Remove any sharp objects from the trailer (inside and out).
|
| • |
Check the floor boards to make sure they are not rotted.
|
| • |
Tires need to have correct pressure.
|
| • |
Check wheel lug nuts and bolts.
|
| • |
Light and brake systems need to be checked before the trip to ensure that they are working properly and give you enough time to fix them if need be.
|
| • |
Understand how the hitch works.
|
| • |
Have heavy safety chains attached.
|
| • |
If new to driving while pulling a trailer, practice before the trip—empty first, then loaded.
|
| • |
Make sure gates/dividers are secure.
|
| • |
Double-check all doors/gates/windows to make sure they are all properly latched.
|
| • |
Flooring should not be slippery. Grooves in the floor and rubber mats help prevent this, as does wood shavings or straw.
|
|
 |
|
 First-Aid
By K.D. Houlding, DVM
Develop a relationship with a veterinarian who knows you and your horses.
Items to know—if you do not know how,
ask your veterinarian to teach you:
| • |
How to use a twitch and other restraints.
|
| • |
How to give oral medicine, give an intramuscular injection and an intravenous injection.
|
| • |
How to take a horse’s temperature, pulse, respiratory rate, and assess gut sounds.
|
| • |
How to bandage properly.
|
| • |
The parts of your horse including the bones.
|
What's normal
| • |
Pulse rate: 30-45 beats per minute.
|
| • |
Respiratory rate: 8-20 breaths per minute.
|
| • |
Rectal temperature: 99.5-101.5.
|
| • |
Capillary refill time: 2 seconds.
|
Other observations:
| • |
Skin pliability is tested by pinching or folding a flap of neck skin and releasing. It should immediately snap back into place.
|
| • |
Color of the mucous membranes, nostrils, conjunctiva (inner eye tissue), and inner lips of vulva should be pink. Bright red, pale pink to white, or bluish-purple coloring may indicate problems.
|
| • |
Color, consistency, and volume of feces and urine should be typical of that individual’s usual excretions. Straining or failure to excrete should be noted.
|
| • |
Signs of distress, anxiety or discomfort.
|
| • |
Lethargy, depression or anorexia.
|
| • |
Presence or absence of gut sounds.
|
| • |
Evidence of lameness such as head-bobbing, reluctance to move, odd stance, pain, unwillingness to rise.
|
| • |
Bleeding, swelling, evidence of pain.
|
| • |
Seizures, paralysis or "tying-up."
|
How to:
Take your horse's temperature.
Use a glass or electronic rectal thermometer. If you use a glass one, tie a string with a clip on the end of the thermometer's end loop. Shake down a glass thermometer's end loop. Shake down a glass thermometer, activate an electronic one. Lubricate the tip with a dab of K-Y or petroleum jelly. Tie your horse, and gently insert the thermometer into his anus to a depth of about 2 inches. Clip a glass thermometer to his tail for security. Hold the thermometer in place. Wait about 2 minutes for a glass one to register, about 30 seconds for an electronic one — listen for the beep. Remove the thermometer, and record your reading.
Take your horse’s respiration.
Watch the rib cage move, count the breaths over a 30-second period and multiply by two to get the minute respiratory rate. If you cannot see the ribs move, see if you can see the nostrils dilate with each breath and count those.
Take your horse's pulse.
| 1. |
Hold the horse's lead close to the head to keep it still. Place your index finger under the jaw against the inside of the horse's cheek. Move your finger back and forth feeling for the blood vessels. You can feel it roll under your moving finger. Place the tip of your finger over the vessel with firm but gentle pressure. Concentrate on what that finger is feeling. Give yourself time to pick up the pulsations. Once you are feeling the pulse regularly, time the number of pulses over a 15-second period. Multiply the number by four to give you the minute heart rate of the horse.
|
| 2. |
To use a stethoscope: Place your horse's left front foot forward (if he's standing). Place the head of a stethoscope against his chest wall, just beneath his left elbow, then push the scope as far toward and under the elbow as possible. Listen for the "lubdub" sound of his heartbeat. Count the number of beats in a 15-second period, and multiply that number by four to determine his beats-per-minute (bpm).
|
Take your horse's digital pulse.
Squat down on the side of your horse's left front leg, and place your index finger around the left side of the fetlock joint at its lower edge. Apply pressure with your finger around the fetlock joint, until you feel a cordlike bundle (consisting of vein, artery, and nerve) underneath your touch. Apply pressure to this bundle for 5 to 10 seconds until you feel a pulse. (Note: If you can't find a pulse, adjust the amount of pressure you're placing on the bundle. If you press too hard, you'll cut off blood flow--therefore the pulse. If you press too softly, you won't create enough resistance to feel the pulse at all).
It helps to know what a healthy pulse feels like — but you can't always find a pulse on a healthy leg/hoof. It might be too faint. If you can easily find his digital pulse, he/she may have a problem.
Listen for gut sounds with a stethoscope.
Hold the stethoscope against your horse's lower flank for at least 1 minute. Move the stethoscope higher on his flank, and listen again. Move to his other flank, and repeat this procedure. Normally, you'll hear two to four soft bubbles/gurgles per minute, and one loud grumbling sound every 2 to 3 minutes. If his gut sounds are louder and/or more frequent, he may be experiencing mild colic. If you hear nothing (and your stethoscope is working), he may be experiencing severe colic--silence indicates no gut movement.
First-aid kit:
| • |
Glass, electronic or plastic strip thermometer with string and clip attached.
|
| • |
Stethoscope.
|
| • |
Penlight.
|
| • |
Gauze squares and sponges for cleaning and applying pressure to wounds.
|
| • |
Forceps for removing foreign bodies or pinching shut a bleeding artery.
|
| • |
Surgical scrub.
|
| • |
Water or saline solution (contact lens solution)..
|
| • |
Jet-spray bottle for irrigating wounds.
|
| • |
Nonstick wound pads - assorted sizes.
|
| • |
Leg wraps and padding (cotton sheets, quilts, etc.).
|
| • |
Compression bandage (Vetrap, Coban, Expandover, etc.).
|
| • |
Adhesive wrap (stretch gauze) & adhesive tape.
|
| • |
Cotton roll.
|
| • |
Easyboot or other treatment boot.
|
| • |
Cold wraps.
|
| • |
Sharp Scissors (Must have rounded ends and should be kept sharp).
|
| • |
First-aid tape.
|
| • |
Steel cup or container.
|
| • |
Latex gloves.
|
| • |
Permanent marker pen.
|
| • |
Pliers (to pull nails).
|
| • |
6" diameter PVC tubing cut in half the long way into lengths of 1.5-2 feet (for emergency splinting).
|
| • |
Reference materials.
|
| • |
Bucket.
|
| • |
Heat packs.
|
| • |
Ice.
|
| • |
Twitch.
|
| • |
Duct tape.
|
| • |
Syringes.
|
| • |
Tweezers/forceps (to remove splinters, etc.).
|
| • |
Wound Powder/Ointment.
|
| • |
Antibiotic Aerosol.
|
| • |
Fly Repellent.
|
| • |
Epsom Salts (for soaking abscessed feet)
|
References
All Materials on IowaHorseCouncil.org are copyrighted.
Copyright © 2004-2006 Iowa Horse Council. All rights reserved.
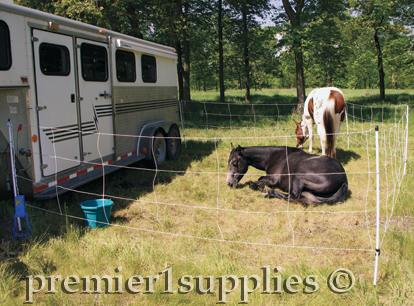
A NIFTY FENCE IDEA
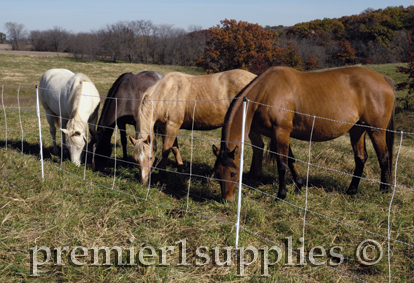
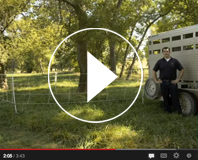
Need a fence for your horses when you're on the trail, at the show or in the pasture? Try Horse QuikFence™ for a reliable and visible fencing solution.
Horse QuikFence™ 4/48/24
Missing the creak of saddle leather and the feel of stirrups beneath your feet? Get out of the office or away from home and out on the trail! Take your trusty steed for an overnighter and enjoy the outdoor life. While on the trail, keep your horse(s) fenced in to prevent riderless wanderings and protect them during the night.
Premier's solution:
Horse QuikFence™ 4/48/24
A ready-to-go electrifiable mesh that takes only minutes to install. Line posts are already built into each roll. Just connect to an energizer and you're ready to go.
| • |
Attractive, safe fence.
|
| • |
Very visible.
|
| • |
Effective, no-worry barrier.
|
| • |
Installs with ease up and down hills, across valleys, around curves and next to trailers.
|
| • |
Also stops cattle, camelids and most deer.
|
| • |
Ideal for subdivision fences, semi-permanent boundary fences and as a weekend fence for shows and trail rides.
|
Use for:
| 1. |
Trailer paddocks—When camping or at the show, build a paddock adjacent to the back of your trailer. Allows horses walking room without having to tie them up.
|
| 2. |
Trail rides—Set up night encampment in style with a small paddock for your horse(s). 12B energizers are small enough to pack on the trail along with QuikFence.
|
 Click here If you missed our May Horse Newsletter—Introducing Horses to Electric Fencing and Important Safety Tips.
Customer Reviews
Matthew R from Upstate New York

Would you recommend this product? Yes
Wonderful product! Easy to set up if you follow their directions.
Here's a tip... to store this I found a ski bag was perfect! It fit the fence, and additional corner support posts. I also got the step in battery fence charger and that fit in the bag as well!
Michele N from Colorado
Would you recommend this product? Yes
I took my 2 horses on a 3 day camping trip. This fence worked incredibly well. It was easy to set up, tear down, and did not take up much room in the trailer. The horses had ample room to move around. Loved it!
See more reviews »
|
|