
Exhibiting at the following workshop:
P. Allen Smith
Poultry Workshop
Moss Mountain Farm
Saturday, April 20
Roland, AR
For more information, visit P. Allen Smith
NEW FROM PREMIER
New! Egg Stamps

Make your eggs stand out at the local farmers market with Egg Stamps from Premier. Egg Stamps are an incredibly fast, easy way to customize eggs and remind your customers of your brand each time they use an egg.
Imprinting options are illustrations of the sun or a chicken or the words 'organic' and 'free range.' Stamps use food-grade ink and can imprint up to 30,000 eggs.
PRODUCT SPOTLIGHT
Classic Waterers and Feeders
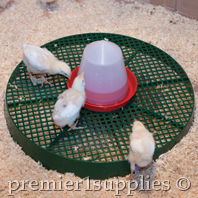
I appreciate any item that saves time when doing chores. For feeding and watering chicks in the brooder, I will never use anything but the Classic Waterer .25 gal. (shown in photo above with our Chick Stand) and the Classic Feeder 2.2 lb.
I have used other feeders and waterers in the past for brooding chicks, but nothing solved the common problems of waste in the food and water. The chicks would perch on anything they could get onto. They scratched the grain out of the tray and wasted it. There was always a risk of having a chick fall into the water tray and possibly drown. I was growing tired of repeated cleanings for both the feeder and waterer every morning and night.
I tried the Classic feeder and waterer thinking it wouldn't hurt, the price was great and I like to try new things. I assumed it wouldn't help with the waste problem that just kept recurring but I was wrong. The cone-shaped plastic top has a smooth surface that allows feed to slide down and not stick to the sides. The same surface on the outside keeps chicks from perching and doesn't provide a ledge for them to grip onto.
The best thing about the Classic waterer is the base. The tray is narrow enough so that no chick can fall into it, but it doesn't prevent the chicks from getting a drink. With the push-fit base, it was extremely easy to fill with less mess. I placed it on a brick to keep any loose bedding from falling into it. I now save time because I don't have to clean each time they need more feed or water. This makes my chicks and me very happy.
by Kolby Freeman
Premier's Product Consultant
View all of Premier's waterers and feeders.
|
 |
|
PREPARING FOR YOUR CHICKS
Brooder Basics
One of the easiest ways to start raising chickens is by starting with day old chicks and a brooder.
Day old chicks can be purchased through one of many chicken hatcheries or through your local farm supply store in the spring. This is probably the most common way of starting a backyard flock of chickens.
Day old chicks are ordered and then shipped to you through the US Postal Service. Some breeds of chickens are only available at certain times of the year and others year round.
You will need a brooder to put your chicks in when they arrive. A brooder can be a commercially produced unit or a simple homemade item. It must be large enough to hold the chicks to an age of 6-7 weeks. It should be deep enough to keep the chicks from jumping out as they grow and keep them from drafts.
Line it with layers of shredded newspaper for the first few days, then replace the paper with pine shavings or other similar material after the chicks find out what their food looks like. You do not want them to eat the shavings, it will make them sick. Do not use sawdust, cedar or treated wood chips. Straw, rice hulls, or ground cobs also make a good litter.
Important things to know about starting with day old chicks.
Water for chicks
The very first thing to do before you release the chicks into the brooder is to dip their beaks into water to get them to drink. A one gallon waterer should be provided for every 50 chicks. Depending on the breed you choose, I recommend adding vitamin supplements to the water for better health. Do not let them run out of water.
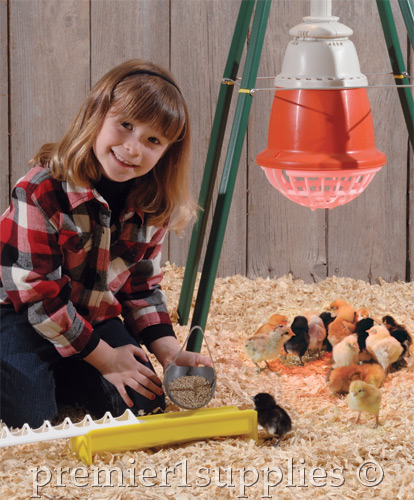
Temperature for chicks
Start your chicks out with a heat lamp that is placed high enough above the brooder floor to keep it at 90-95 degrees. Raise the heat lamp enough each week to lower the temperature by 5 degrees until it gets to 70 degrees. The chicks will then be ready to be placed in their coop or range depending on the outside temperature. I recommend that you time the purchase of your chicks so that outside temperatures are high enough to keep the birds from getting chilled, especially at night, when you are ready to put them outside.
Feed for chicks
Use a chick starter feed for the first 8 weeks. Make sure that it has the correct protein level for your specific breed. Meat chickens will require higher protein content. Fast growing breeds such as the Cross Rocks will also need supplements to keep them from breaking their legs due to their fast growth. Use a 24 inch feeder for every 25 chicks. After the 3rd day, mix a small amount of grit with the feed to aid in digestion.
Spacing for chicks
Initially, provide 1/2 square foot of space per bird and increase it to 3/4 of a foot after 4 weeks.
Written by:
Bob White, chickens101.com
HOW TO VIDEOS
How to set up a Chick Brooder
Premier goes over the basics of assembling a brooder for chicks with our brooder panels. This setup also works with ducklings, goslings and other young poultry.
Heat Lamp Stand Assembly
Use Premier's Heat Lamp and Heat Lamp Stand to keep your chicks warm. It's easy to assemble. See our video below.

PREMIER TIP
 Pasty Butt or Sticky Bottoms?
What is it and how to treat it...
Pasty butt is exactly what the words describe-when a chick's droppings collect around its vent and dry, preventing the chick from being able to pass manure.
This often occurs on newly hatched chicks that experienced stress (usually shipping). It can occur in chicks older than one week, but this is usually linked to a brooder environment that has resulted in stressed, overheated or chilled chicks.
To treat, carefully spray warm water over the bird's vent and gently massage the manure away with a moist washcloth or paper towel. Do not pick at the mass-the chick's thin skin can easily become irritated or even torn. Place the treated chicks in a warm area or under a heat lamp until their downy feathers dry.
|
|
