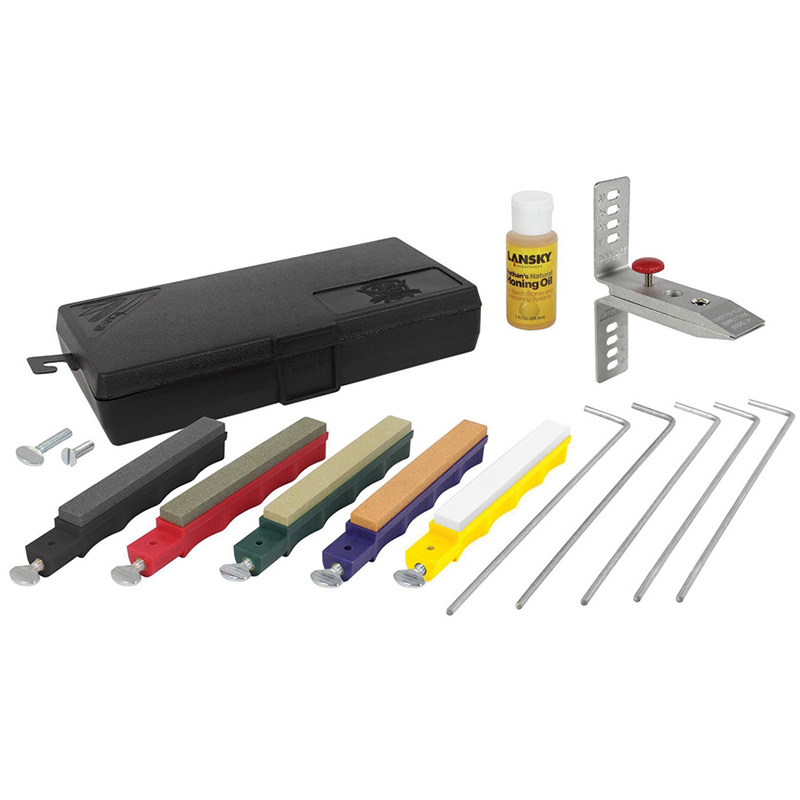
Lansky Deluxe Knife Sharpening System
Product Details
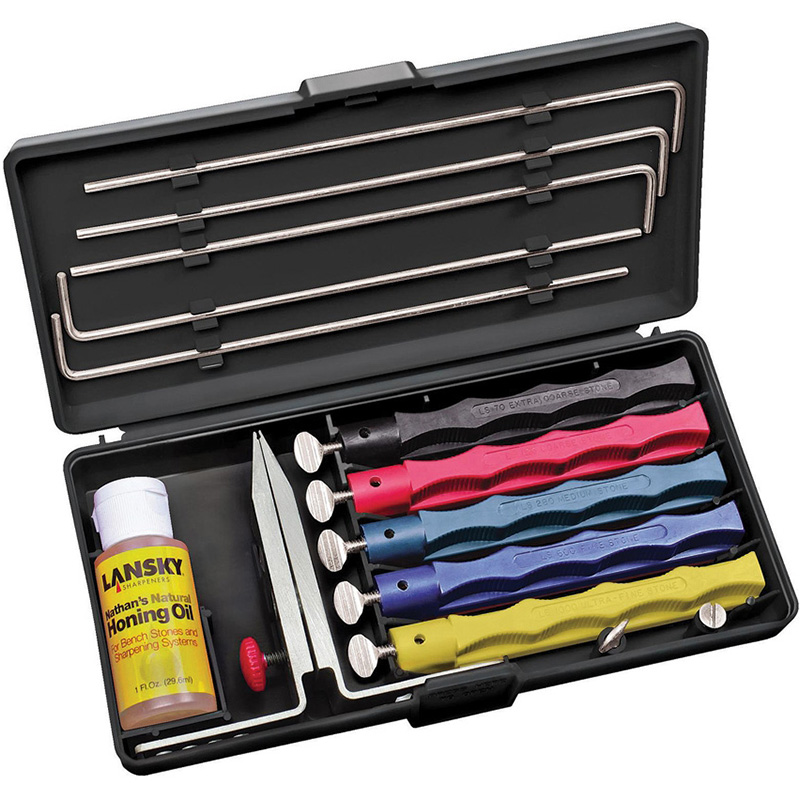
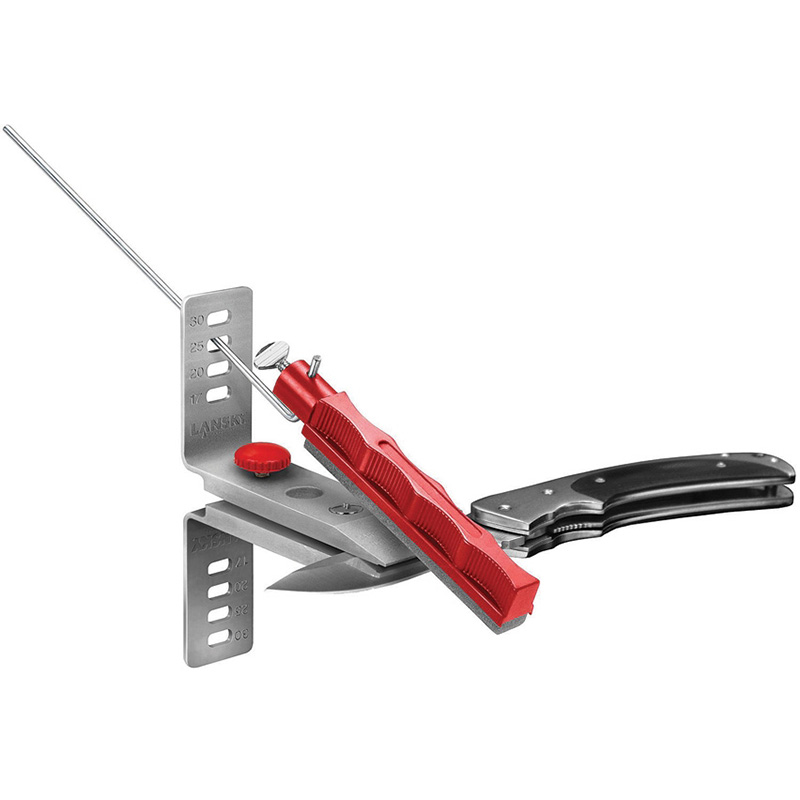
Controlled-angle system allows users to guide sharpening stones over knife blades while maintaining a desired angle.
Easy-to-use system is intuitive for beginners, relied upon by advanced users.
Features:
- Five (5) hone grits (extra coarse, coarse, medium, fine, ultra-fine) for shaping dull blades to a highly sharpened polish
- Four (4) sharpening angles to match your intended use, from heavy cardboard cutting to a razor’s edge
- Clamp secures knife and precisely controls sharpening angle for a reliable finish

Benefits
- 17° Angle - A severe angle recommended for razor blades, fillet knives or similar tools. An extremely sharp but delicate edge.
- 20° Angle - A commonly used angle for higher quality blades and provides an excellent edge for kitchen cutlery and slicing knives.
- 25° Angle - The recommended angle for most knives that need a durable, sharp edge. Ideal for hunting and outdoor knives.
- 30° Angle - An outstanding angle for knives that cut cardboard, rope or carpets. Recommended for heavy duty use.
Specs
- 1 oz honing oil, specially formulated for sharpening
- Easy to use, multi-angle clamp: to hold the blade securely
- Guide Rods: One for every hone (5)
- Storage case
- Made in the USA
| Hone | Grit | Color |
|---|---|---|
| Extra Coarse | 70 | Black |
| Coarse | 120 | Red |
| Medium | 280 | Green |
| Fine | 600 | Blue |
| Ultra-Fine Ceramic | 1000 | Yellow |
How to Use
If blade is 7” or less in length
- Position the clamp in the middle of the blade.
- After sharpening, flip the clamp (and blade) over.
- Repeat the sharpening process on the unsharpened side.
If blade is greater than 7” in length
- Pick the end of the blade where you would like to start sharpening and place the clamp two finger widths away from that end of the blade. (For example, if you choose the tip, place the clamp 2 finger widths from away the tip.)
- When you have the blade secured in the clamp, place your 2 fingers along both sides of the knife clamp. The area covered by your fingers (on both sides of the clamp) is your target sharpening zone. Try not to sharpen outside this zone, as this will change the angle of the hone and result in a poorly sharpened blade.
- Sharpen your target zone, and with the knife still secured in the clamp, flip the clamp (and knife) over and repeat this process on the other side of the blade.
- When you are finished with the first zone on both sides of the blade, measure another two-finger width starting at the edge of your freshly-sharpened area, and place the clamp next to your fingers.
- Sharpen this new target zone as you did the first, roughly using the same number of sharpening strokes. Your use of this method will minimize gaps and overlaps
- between your target zones, helping to ensure a continuous sharp edge when you are finished.
Hone selection
- Always progress through the hones in order of decreasing coarseness—that is, start with a coarser hone and work your way down to the finest.
- The hone you begin with will vary depending on what type of sharpening you want to do.
- For aggressive sharpening tasks, such as changing the angle of a blade or sharpening a very dull edge, begin with the coarsest hone in your kit (coarse or extra-coarse), and then progress through medium, fine, etc.
- For lighter-duty sharpening jobs, like angle maintenance or general “touch-up” work, begin with the medium hone.
Sharpening strokes
- For best results, your strokes should move diagonally forward (towards the guide hole in the clamp) and along a small section of the blade, using the full length of the hone with each stroke.
Remember
- Always sharpen into the blade (perpendicular not parallel)!
- It is important that you use approximately the same amount of strokes for each target sharpening zone, as this will help ensure a uniformly sharpened blade.
Oil usage
- Standard hones included in this kit (Alumina Oxide): Do not require oiling however you will note as you sharpen, that the stones will begin to move more smoothly. This indicates pores of the stones may be clogging with filings, which reduces the effectiveness of the stone. Clean by putting a few drops of oil on the hone. The oil will lift the metal shavings off the stone’s surface where they can be wiped away with a rag.
Pressure
- When using the coarse hone, apply a generous amount of pressure. As you move to the medium and fine hones, use less pressure.
Finishing up
- If when you have finished, the edge is still not as sharp as you would like, continue polishing the blade with your fine hone.
- If you have a single-sided or serrated blade, drag your fine hone down the length of the non-sharpened side a few times to clean off any stray metallic burrs that may have accumulated during sharpening.
- Be Smart, Be Safe and Stay an Edge Above the Rest!
Precautions
-
Processing Products
Poultry Sticker Knife
Item #540381 -Use this carbon steel (quick to take an edge) knife to cut the bird's jugular during processing.
$24.00 -
Processing Products
Poultry Processing Kit
Item #540380 -Process your own chickens with this kit. Includes cone, knife and shackle.
$129.00

Write a Review
You must be logged in to leave a review. Please sign in.
Elizabeth S from Texas
Beginner friendly. Dummy proof sharpening. I was trying to find someone to sharpen my hand tools, and instead I found out how to do it myself. I’ve used this kit on hedge trimmers, goat hoof trimmers, tree loppers, and of course knives. This is worth the cost in every way. I feel confident and capable.